新規作成日 2020-02-19
最終更新日
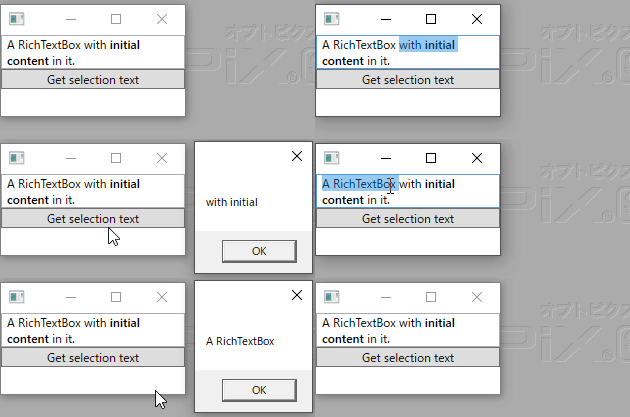
WPFのRichTextBox内で、マウスで選択した範囲を取得するには、RichTextBoxのSelectionプロパティを使用します。
WPFで、Code OnlyでUIを作成する
WPFで、UIを作成する際、xaml表記を使用すると簡単に表記できます。しかし、データやユーザー操作によって、プログラムの実行中にUIを操作する際には、コードで操作する必要があります。
using System;
using System.Windows;
using System.Windows.Controls;
using System.Windows.Documents;

namespace rtfApplyPropertyValue
{
    class rtfApplyPropertyValue : Window
    {
        [STAThread]
        public static void Main()
        {
            Application app = new Application();
            app.Run(new rtfApplyPropertyValue());
        }
        public rtfApplyPropertyValue()
        {
            // スタックパネルを作成する
            StackPanel myStackPanel = new StackPanel();

            // ウィンドウの大きさを設定する
            Width = 200;
            Height = 120;

            // VerticalScrollBarVisibilityプロパティをAutoに設定して、新しいRichTextBoxを作成します。
            RichTextBox rtb = new RichTextBox();
            rtb.VerticalScrollBarVisibility = ScrollBarVisibility.Auto;

            // プレーンテキストといくつかの太字のテキストのRunを作成します。
            Run myRun1 = new Run();
            myRun1.Text = "A RichTextBox with ";
            Bold myBold = new Bold();
            myBold.Inlines.Add("initial content ");
            Run myRun2 = new Run();
            myRun2.Text = "in it.";

            // 段落を作成して、それにRunとBoldを追加します。
            Paragraph myParagraph = new Paragraph();
            myParagraph.Inlines.Add(myRun1);
            myParagraph.Inlines.Add(myBold);
            myParagraph.Inlines.Add(myRun2);

            // 新しいFlowDocumentを作成し、3つの段落を追加します。
            FlowDocument flowDoc = new FlowDocument();

            // 段落をFlowDocumentに追加します。
            flowDoc.Blocks.Add(myParagraph);

            // フロー文書をRichTextBoxの文書に設定する
            rtb.Document = flowDoc;

            // スタックパネルに、RichTextBoxを格納する
            myStackPanel.Children.Add(rtb);
            this.Content = myStackPanel;

            // ボタンを追加する
            Button button = new Button() { Content = "Get selection text" };
            myStackPanel.Children.Add(button);

            // ボタンのクリックイベントを追加する
            button.Click += (sender, e) =>
            {
                // メッセージボックスで、選択範囲をテキストとして表示する
                MessageBox.Show(rtb.Selection.Text);
            };
        }
    }
}
実行結果
