概要
WPFで、メインウィンドウから子ウィンドウを開くコードの実装方法です。
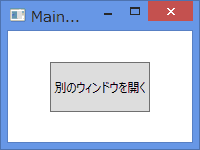
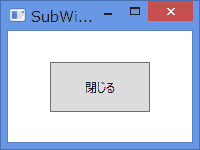
実行結果
別のウィンドウを開くボタンを押すと別のウィンドウが開きます。別のウィンドウにある閉じるボタンを押すとそのウィンドウが閉じます。
実装手順
メインウィンドウをデザインします
[MainWindow.xaml]
<Window x:Class="MultiWindow01.MainWindow"
        xmlns="http://schemas.microsoft.com/winfx/2006/xaml/presentation"
        xmlns:x="http://schemas.microsoft.com/winfx/2006/xaml"
        Title="MainWindow" Height="150" Width="200">
    <Grid>
        <Button Name="btn0" HorizontalAlignment="Center"
        			VerticalAlignment="Center" Width="100" Height="50">
            別のウィンドウを開く
        </Button>
    </Grid>
</Window>
サブウィンドウを追加します。
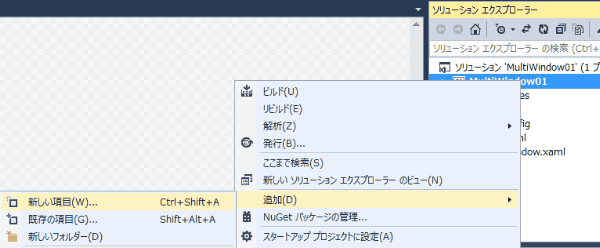
ソリューションエクスプローラーのプロジェクト上で、右クリックしてコンテキストメニューを表示させます。メニューで、「追加」→「新しい項目」を選択します。
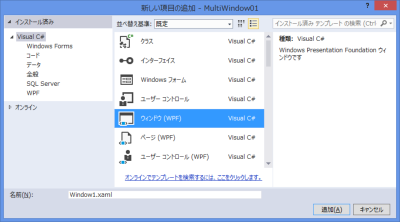
ウィンドウ(WPF)を追加します。
サブウィンドウをデザインします
[Window1.xaml]
<Window x:Class="MultiWindow01.Window1"
        xmlns="http://schemas.microsoft.com/winfx/2006/xaml/presentation"
        xmlns:x="http://schemas.microsoft.com/winfx/2006/xaml"
        Title="SubWindow" Height="150" Width="200">
    <Grid>
        <Button Name="btn0" HorizontalAlignment="Center"
        			VerticalAlignment="Center" Width="100" Height="50">
            閉じる
        </Button>

    </Grid>

</Window>
イベントを追加します
MainWindow.xamlのボタンにクリックイベントを追加します。
[MainWindow.xaml]
<Window x:Class="MultiWindow01.MainWindow"
        xmlns="http://schemas.microsoft.com/winfx/2006/xaml/presentation"
        xmlns:x="http://schemas.microsoft.com/winfx/2006/xaml"
        Title="MainWindow" Height="150" Width="200">
    <Grid>
        <Button Name="btn0" HorizontalAlignment="Center"
        			VerticalAlignment="Center" Width="100" Height="50" Click="btn0_Click">
            別のウィンドウを開く
        </Button>

    </Grid>

</Window>
イベントの動作を実装します。Window1のインスタンスを作成し、Show()メソッドでウィンドウを表示します。 ウィンドウをどのクラスで宣言したらいいのかわからないので、verでインスタンスを作成します。
[MainWindow.xaml.cs]
using System.Windows;

namespace MultiWindow01
{
    /// <summary>
    /// MainWindow.xaml の相互作用ロジック
    /// </summary>
    public partial class MainWindow : Window
    {
        public MainWindow()
        {
            InitializeComponent();
        }

        private void btn0_Click(object sender, RoutedEventArgs e)
        {
            var win = new Window1();
            win.Show();
        }
    }
}
Window1()は、開くウィンドウの名前が[Window1.xaml]であるためです。
[Window1.xaml]にもクリックイベントを追加します。
[Window1.xaml]
<Window x:Class="MultiWindow01.Window1"
        xmlns="http://schemas.microsoft.com/winfx/2006/xaml/presentation"
        xmlns:x="http://schemas.microsoft.com/winfx/2006/xaml"
        Title="SubWindow" Height="150" Width="200">
    <Grid>
        <Button Name="btn0" HorizontalAlignment="Center"
        			VerticalAlignment="Center" Width="100" Height="50" Click="btn0_Click">
            閉じる
        </Button>

    </Grid>

</Window>
ボタンを押したら、Window1を閉じるコードを実装します。
[Window1.xaml.cs]
using System.Windows;

namespace MultiWindow01
{
    /// <summary>
    /// Window1.xaml の相互作用ロジック
    /// </summary>
    public partial class Window1 : Window
    {
        public Window1()
        {
            InitializeComponent();
        }

        private void btn0_Click(object sender, RoutedEventArgs e)
        {
            this.Close();
        }
    }
}
説明
メインウィンドウの「別のウィンドウを開く」ボタンを押すと、別のウィンドウが開きます。そのウィンドウの「閉じる」ボタンを押すと、開いたウィンドウを閉じます。
ここでのポイントは、ウィンドウを開く前に、ウィンドウのインスタンスを作成ししておくことです。
呼び出し元のウィンドウが使えないようにするには
上記の例では、他のウィンドウを呼び出しても、呼び出し元のウィンドウは、これまで通り動作します。
呼び出した側を閉じるまで、呼び出し元のウィンドウを操作できないようにするためには、ShowDialog()メソッドを使ってウィンドウを開きます。