WPFでRichTextBoxを使って、メモ帳によく似たアプリケーションを作る方法は、チュートリアルとして公開されています。
その時のコードを参考に、メモ帳のようなアプリケーションを作成しました。
Visual Studioのバーションが変化すると、参照しているライブラリが微妙に変化することで、うまく動作しないことがあるので、確認のために、今回、改めて、C#のWPFアプリケーションで、「ツール バーのある RichTextBox の作成のサンプル」を作成します。 Visual Studio 2017 Communityを使用しました。
インターネット上では、「WPFでRichTextBoxを使って、メモ帳によく似たアプリケーションを作る方法」について調べるのは、困難です。
このページで紹介した例でも、フォントを変更する機能や、文字色、背景色を変更する機能を実装する法については、触れていません。
「Applications = Code + Markup: A Guide to the Microsoft® Windows® Presentation Foundation」(Charles Petzold著)に、 「WPFでRichTextBoxを使って、メモ帳によく似たアプリケーションを作る方法」についての方法が詳しく紹介されているので、興味ある人は、英語で書かれていますが読んでみることをお勧めします。
プロジェクトを開始する
![Visual Studioを起動し、[ファイル]から、[新規作成]、[プロジェクト]を選択します。Visual Studio 2017 Communityを使用しています。](Images/007-001.png)
Visual Studioを起動し、[ファイル]から、[新規作成]、[プロジェクト]を選択します。Visual Studio 2017 Communityを使用しています。
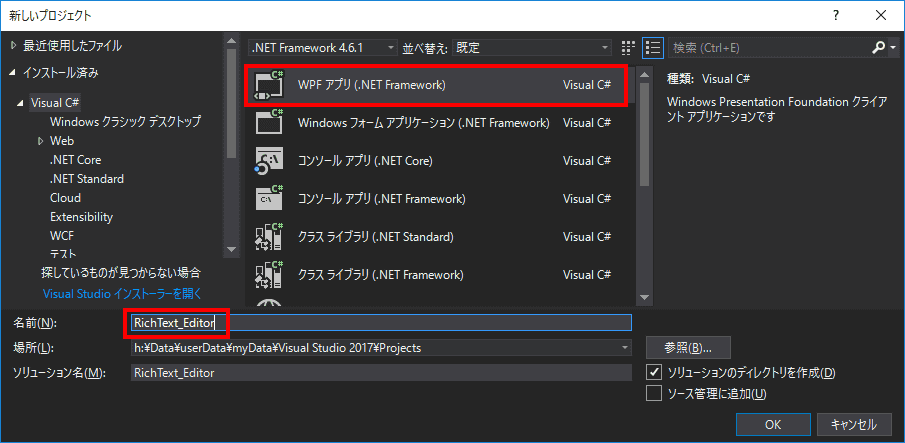
「WPFアプリ(.Net Framework)」を選択し、名前に「RichText_Editor」と入力し、OKをクリックします。
RichTextBoxを追加する
xamlコード「MainWindow.xaml」の<Grid></Grid>の間に、空のRichTextBoxを追加します。<RichTextBox />がその部分のコードです。
<Window x:Class="RichText_Editor.MainWindow"
        xmlns="http://schemas.microsoft.com/winfx/2006/xaml/presentation"
        xmlns:x="http://schemas.microsoft.com/winfx/2006/xaml"
        xmlns:d="http://schemas.microsoft.com/expression/blend/2008"
        xmlns:mc="http://schemas.openxmlformats.org/markup-compatibility/2006"
        xmlns:local="clr-namespace:RichText_Editor"
        mc:Ignorable="d"
        Title="MainWindow" Height="250" Width="325">
    <Grid>
        <!-- A RichTextBox with no initial content in it. -->
        <!-- 初期値のないRichTextBox。-->
        <RichTextBox />
    </Grid>
</Window>
このコードの変更だけで、RichTextBoxを持つアプリケーションは完成しています。「開始」を実行して、実行してみます。
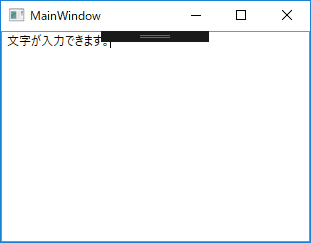
表示されるウィンドウには、何も文字は記入されていませんが、キーボードから文字を入力することができます。文字が入力することができたら、ウィンドウを閉じて、アプリケーションを終了しましょう。
ツールバーを追加する
ツールバーを追加し、RichTextBoxクラスにメソッドとして実装されている編集コマンドを追加します。
ツールバーは、ツールバートレイに格納しておくと、ツールバーを複数格納するときに便利です。
xamlコード「MainWindow.xaml」にコードを追加して、次のように変更します。
<Window x:Class="RichText_Editor.MainWindow"
        xmlns="http://schemas.microsoft.com/winfx/2006/xaml/presentation"
        xmlns:x="http://schemas.microsoft.com/winfx/2006/xaml"
        xmlns:d="http://schemas.microsoft.com/expression/blend/2008"
        xmlns:mc="http://schemas.openxmlformats.org/markup-compatibility/2006"
        xmlns:local="clr-namespace:RichText_Editor"
        mc:Ignorable="d"
        Title="MainWindow" Height="250" Width="325">
    <Grid>
        <!-- Set the styles for the tool bar. ツールバーのために、スタイルを設定します。 -->

        <DockPanel Name="mainPanel">
            <ToolBarTray Name="mainToolbarTray" DockPanel.Dock="Top">
            <!-- This tool bar contains all the editing buttons.
                このツールバーには、すべての編集ボタンが含まれています。-->

                <!--編集ツールバーです-->
                <ToolBar Name="EditToolbar" Height="30" DockPanel.Dock="Top">

                <Button Command="ApplicationCommands.Cut" ToolTip="Cut">
                    <Image Source="Images\EditCut.png"></Image>
                </Button>
                <Button Command="ApplicationCommands.Copy" ToolTip="Copy">
                    <Image Source="Images\EditCopy.png"></Image>
                </Button>
                <Button Command="ApplicationCommands.Paste" ToolTip="Paste">
                    <Image Source="Images\EditPaste.png"></Image>
                </Button>
                <Button Command="ApplicationCommands.Undo" ToolTip="Undo">
                    <Image Source="Images\EditUndo.png"></Image>
                </Button>
                <Button Command="ApplicationCommands.Redo" ToolTip="Redo">
                    <Image Source="Images\EditRedo.png"></Image>
                </Button>

                <Button Command="EditingCommands.ToggleBold" ToolTip="Bold">
                    <TextBlock FontWeight="Bold">B</TextBlock>
                </Button>
                <Button Command="EditingCommands.ToggleItalic" ToolTip="Italic">
                    <TextBlock FontStyle="Italic" FontWeight="Bold">I</TextBlock>
                </Button>
                <Button Command="EditingCommands.ToggleUnderline" ToolTip="Underline">
                    <TextBlock TextDecorations="Underline" FontWeight="Bold">U</TextBlock>
                </Button>
                <Button Command="EditingCommands.IncreaseFontSize" ToolTip="Grow Font">
                    <Image Source="Images\CharacterGrowFont.png"></Image>
                </Button>
                <Button Command="EditingCommands.DecreaseFontSize" ToolTip="Shrink Font">
                    <Image Source="Images\CharacterShrinkFont.png"></Image>
                </Button>

                <Button Command="EditingCommands.ToggleBullets" ToolTip="Bullets">
                    <Image Source="Images\ListBullets.png"></Image>
                </Button>
                <Button Command="EditingCommands.ToggleNumbering" ToolTip="Numbering">
                    <Image Source="Images/ListNumbering.png"></Image>
                </Button>
                <Button Command="EditingCommands.AlignLeft" ToolTip="Align Left">
                    <Image Source="Images\ParagraphLeftJustify.png"></Image>
                </Button>
                <Button Command="EditingCommands.AlignCenter" ToolTip="Align Center">
                    <Image Source="Images\ParagraphCenterJustify.png"></Image>
                </Button>
                <Button Command="EditingCommands.AlignRight" ToolTip="Align Right">
                    <Image Source="Images\ParagraphRightJustify.png"></Image>
                </Button>
                <Button Command="EditingCommands.AlignJustify" ToolTip="Align Justify">
                    <Image Source="Images\ParagraphFullJustify.png"></Image>
                </Button>
                <Button Command="EditingCommands.IncreaseIndentation" ToolTip="Increase Indent">
                    <Image Source="Images\ParagraphIncreaseIndentation.png"></Image>
                </Button>
                <Button Command="EditingCommands.DecreaseIndentation" ToolTip="Decrease Indent">
                    <Image Source="Images\ParagraphDecreaseIndentation.png"></Image>
                </Button>

            </ToolBar>
            </ToolBarTray>

            <!-- By default pressing tab moves focus to the next control.
            既定では、タブを押すと、フォーカスを次のコントロールへ移動します。
            Setting AcceptsTab to true allows the RichTextBox to accept tab characters.
            AcceptsTab設定をtrueにすると、RichTextBoxは、タブ文字を受け取ることができます。-->

            <RichTextBox Name="RTB" AcceptsTab="True"></RichTextBox>
        </DockPanel>
    </Grid>
</Window>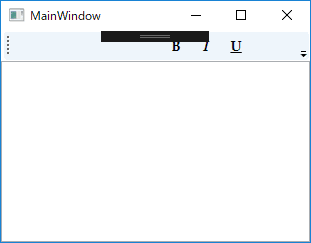
残念ながら、ツールバーに、アイコンが表示されていません。
C# WPFプロジェクトに、アイコンリソースを追加する
ツールバーで使用するアイコンは、リソースとして、プロジェクトに追加しておく必要があります。アイコンは、アイコンエディタを使用して、自分で作成したり、素材集を購入したり、公開されているものを使用したりします。
ここでは、参考したプロジェクトのサンプルファイルに含まれているリソースファイルをそのまま活用します。
ツール バーのある RichTextBox の作成のサンプル
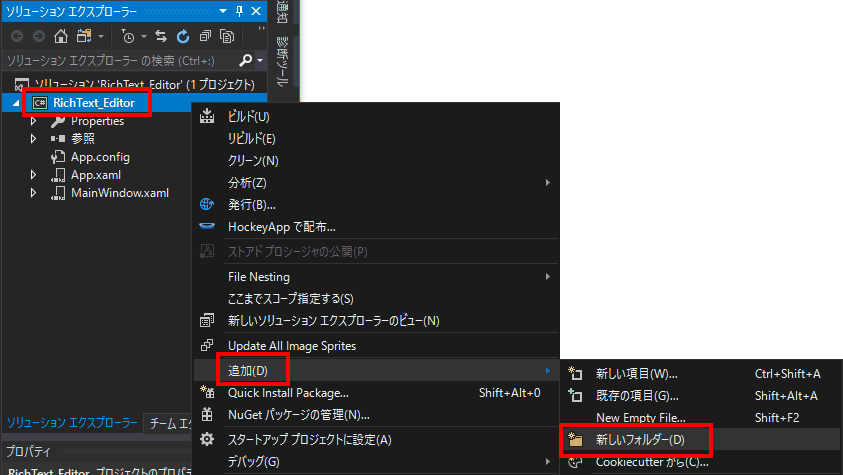
イメージを格納するフォルダを作成します。ソリューションエクスプローラーのプロジェクト名の上で右クリックし、追加、新しいフォルダを選択します。
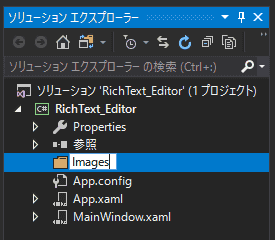
フォルダ名を指定します。

フォルダをエクスプローラーで開きます。
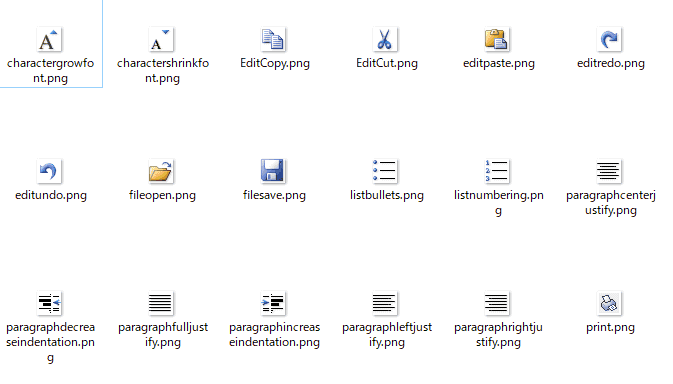
開いたフォルダ内に、アイコンファイルをコピーします。

ソリューション・エクスプローラーで、右クリックし、追加、既存の項目を選択します。
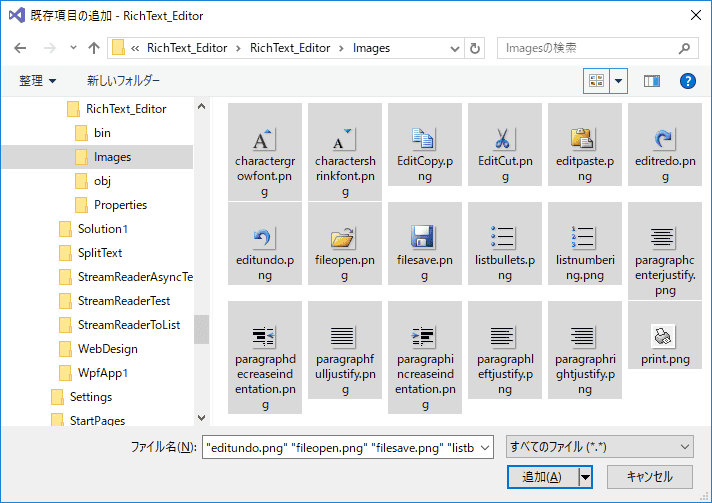
先程、追加したアイコンを選択します。
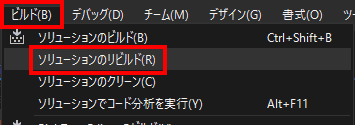
ビルドから、ソリューションのリビルドを選択します。
開始します。
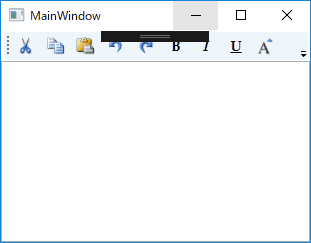
アイコンリソースは、表示されていません。
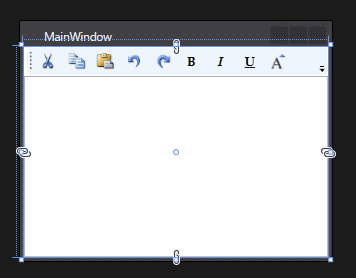
デザイナーには、表示されています。
一番最初のボタンの表記を書き換えたら、きちんと表示されるようになりました。
<Button Style="{StaticResource formatImageStyle}"
	Command="ApplicationCommands.Cut" ToolTip="Cut">
    <Image Source="Images\EditCut.png"/>
</Button>
理由は、謎のままです。
Visual Studio 2019では、pngファイルのプロパティの「ビルドアクション」を「Resouce」に変更します。
C#コードから、リソースファイルを指定する
C#コードないから、リソースファイルを使用する場合、パックURIスキームを利用して、ファイルを指定します。