WPFで画像を表示する方法を探したところ、詳しく説明してあるサイトを見つけたので、実際に、コードを入力し、実行して見ました。
WPFで画像を表示する
新しいプロジェクトをWPFアプリで、作成します。
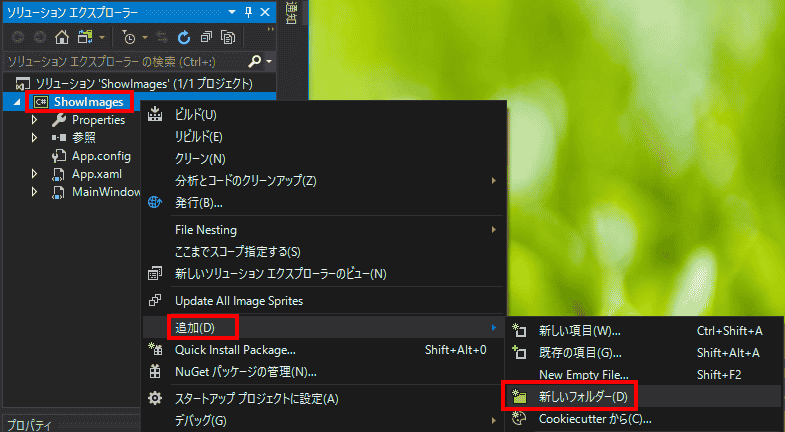
ソリューションエクスプローラーで、新しいフォルダを追加します。
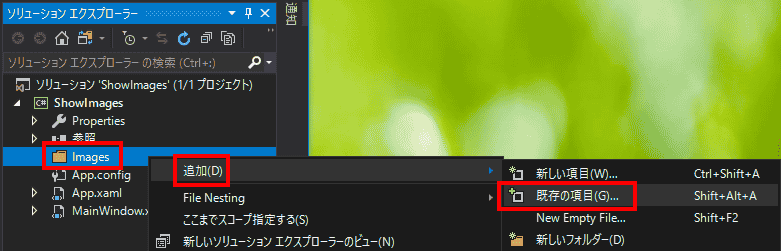
作成したフォルダを選択し、追加、既存の項目を選択します。
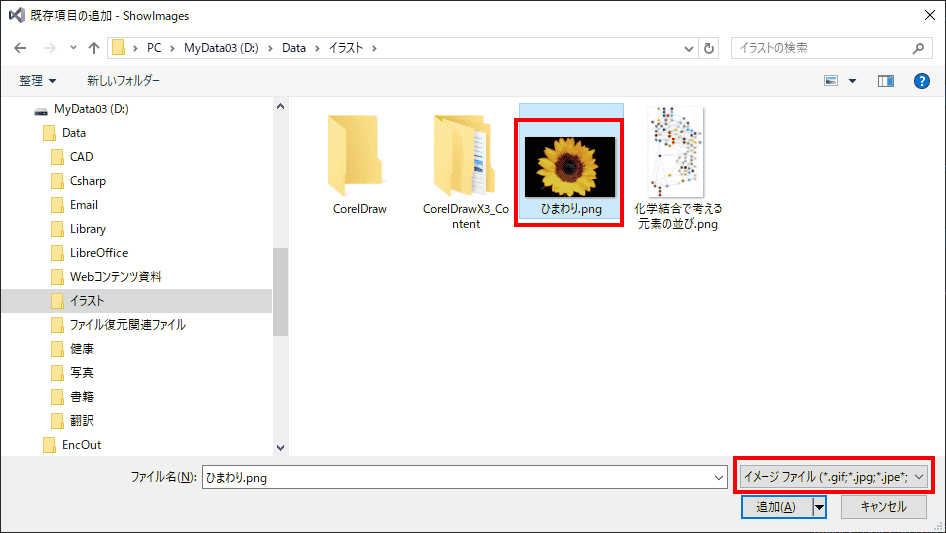
選択フィルタをイメージファイルに変更し、使用する画像ファイルを選択します。
画像を使用するときに備えて、いろいろなものを写真に撮影する習慣をつけましょう。
撮影した写真のデータは、HDDが故障によるデータ消失にそなえて、BD-Rなどの光学ディスクにも保存しておきましょう。
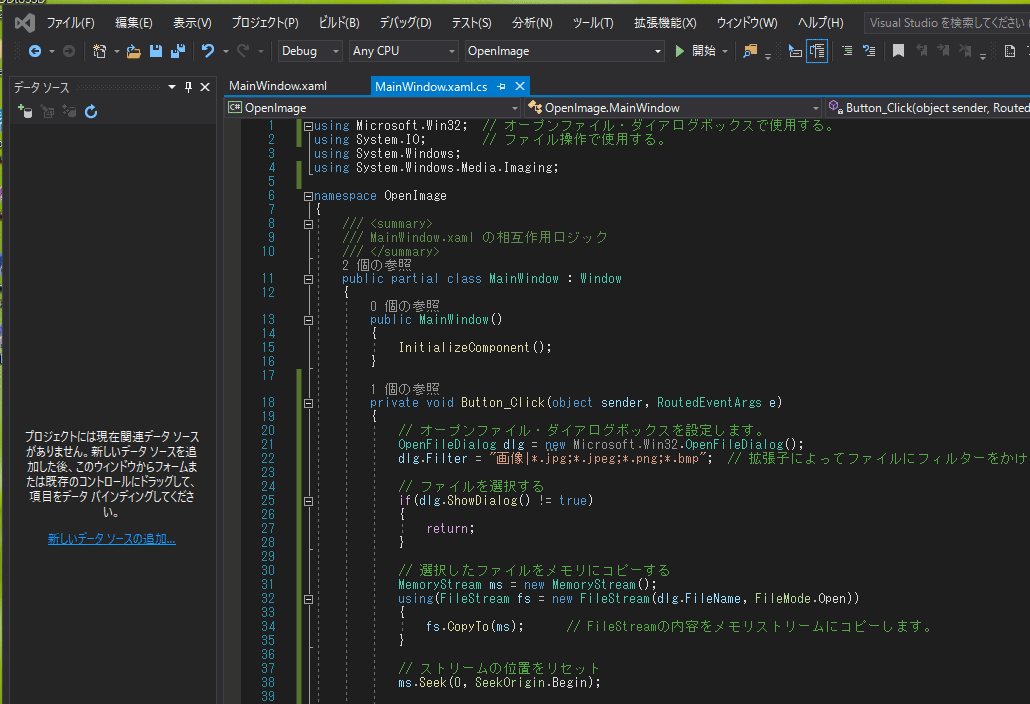
MainWindow.xamlに以下のコードを入力します。
<Window x:Class="ShowImages.MainWindow"
        xmlns="http://schemas.microsoft.com/winfx/2006/xaml/presentation"
        xmlns:x="http://schemas.microsoft.com/winfx/2006/xaml"

        Title="MainWindow" Height="250" Width="300">
    <Grid>
        <Image Source="Images\ひまわり.png" Stretch="UniformToFill" />
    </Grid>
</Window>重要な点は、Image要素で、画像ファイルを指定するSource属性の値に、ファイル名だけでなくファイルを格納したフォルダを含めて指定する必要があることです。うっかり指定し忘れると、画像が表示されない原因を悩みながら探すことになります。
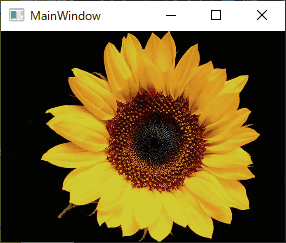
プログラムを実行すると画像が表示されます。
ファイル選択ダイアログ・ボックスで、表示する画像を指定する
ダイアログ・ボックスで、画像ファイルを選択し、画像を表示しようとすると、画像をメモリに取り込んで、画像ファイルとして認識させせる必要があるため一気にコードが難しくなります。
MainWindow.xamlに以下のコードを入力します。
<Window x:Class="OpenImage.MainWindow"
        xmlns="http://schemas.microsoft.com/winfx/2006/xaml/presentation"
        xmlns:x="http://schemas.microsoft.com/winfx/2006/xaml"

        Title="MainWindow" Height="250" Width="300">
    <DockPanel>
        <Button DockPanel.Dock="Bottom" Click="Button_Click">画像を開く</Button>
        <Image DockPanel.Dock="Top" Name="image" Stretch="Uniform" />
    </DockPanel>
</Window>
MainWindow.xam.cslに以下のコードを入力します。
using Microsoft.Win32;  // オープンファイル・ダイアログボックスで使用する。
using System.IO;        // ファイル操作で使用する。
using System.Windows;
using System.Windows.Media.Imaging;

namespace OpenImage
{
    /// <summary>
    /// MainWindow.xaml の相互作用ロジック
    /// </summary>
    public partial class MainWindow : Window
    {
        public MainWindow()
        {
            InitializeComponent();
        }

        private void Button_Click(object sender, RoutedEventArgs e)
        {
            // オープンファイル・ダイアログボックスを設定します。
            OpenFileDialog dlg = new Microsoft.Win32.OpenFileDialog();
            dlg.Filter = "画像|*.jpg;*.jpeg;*.png;*.bmp";  // 拡張子によってファイルにフィルターをかけます。

            // ファイルを選択する
            if(dlg.ShowDialog() != true)
            {
                return;
            }

            // 選択したファイルをメモリにコピーする
            MemoryStream ms = new MemoryStream();
            using(FileStream fs = new FileStream(dlg.FileName, FileMode.Open))
            {
                fs.CopyTo(ms);      // FileStreamの内容をメモリストリームにコピーします。
            }

            // ストリームの位置をリセット
            ms.Seek(0, SeekOrigin.Begin);

            // ストリームをもとにBitmapImageを作成
            BitmapImage bmp = new BitmapImage();
            bmp.BeginInit();            // BitmapImage の初期化の開始を通知します。
            bmp.StreamSource = ms;      // BitmapImage のストリーム ソースを設定します。
            bmp.EndInit();              // BitmapImage の初期化の終了を通知します。

            // BitmapImageをSourceに指定して画面に表示する
            this.image.Source = bmp;
        }
    }
}
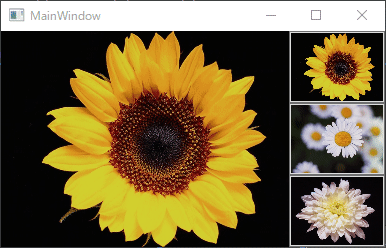
ボタンで表示する画像を切り替える
ボダンを押して、画像を切り替える方法を考えます。
まずは、ボタンに画像を表示する方法を考えてみることにします。いろいろな方法があると思いますが、ここでは、Button要素の中に、Image要素を配置して実現することにしました。
MainWindow.xamlに以下のコードを入力します。
<Window x:Class="SwitchImage.MainWindow"
        xmlns="http://schemas.microsoft.com/winfx/2006/xaml/presentation"
        xmlns:x="http://schemas.microsoft.com/winfx/2006/xaml"

        Title="MainWindow" Height="250" Width="300">
    <Grid>
        <Button Name="btn0" HorizontalAlignment="Center" VerticalAlignment="Center" Width="100" Height="80">
            <Image Source="Images\ひまわり.png" Stretch="UniformToFill"/>
        </Button>
    </Grid>
</Window>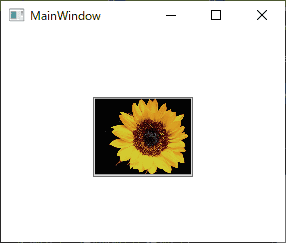
Buttonに画像を表示する方法が確認できたので、Buttonを押して画像を切り替えるコードを考えてみます。
その前に、使用するレイアウトを考えます。レイアウト要素は、Gridで配置しました。
Image要素とImage要素を持つ3つのButton
<Window x:Class="SwitchImage.MainWindow"
        xmlns="http://schemas.microsoft.com/winfx/2006/xaml/presentation"
        xmlns:x="http://schemas.microsoft.com/winfx/2006/xaml"

        Title="MainWindow" Height="255" Width="400">
    <Grid>
        <Grid.ColumnDefinitions>
            <ColumnDefinition Width="3*"/>
            <ColumnDefinition Width="*"/>
        </Grid.ColumnDefinitions>

        <Grid Grid.Column="0">
            <Image Name="image" Source="Images\ひまわり.png" Stretch="UniformToFill"/>
        </Grid>

        <Grid Grid.Column="1">
            <Grid.RowDefinitions>
                <RowDefinition Height="*"/>
                <RowDefinition Height="*"/>
                <RowDefinition Height="*"/>
            </Grid.RowDefinitions>

            <Button Grid.Row="0">
                <Image Source="Images\ひまわり.png" Stretch="UniformToFill"/>
            </Button>

            <Button Grid.Row="1">
                <Image Source="Images\カモミール.png" Stretch="UniformToFill"/>
            </Button>

            <Button Grid.Row="2">
                <Image Source="Images\ダリア.png" Stretch="UniformToFill"/>
            </Button>
        </Grid>

    </Grid>
</Window>


イメージソースは、Imagesフォルダ中に格納してあります。
レイアウトは、実現できたので、Buttonを押すと画像を切り替えるコードを追加します。
MainWindow.xamlに以下のコードを入力します。
<Window x:Class="SwitchImage.MainWindow"
        xmlns="http://schemas.microsoft.com/winfx/2006/xaml/presentation"
        xmlns:x="http://schemas.microsoft.com/winfx/2006/xaml"

        Title="MainWindow" Height="255" Width="400">
    <Grid>
        <Grid.ColumnDefinitions>
            <ColumnDefinition Width="3*"/>
            <ColumnDefinition Width="*"/>
        </Grid.ColumnDefinitions>

        <Grid Grid.Column="0">
            <Image Name="image"  Source="Images\ひまわり.png" Stretch="UniformToFill"/>
        </Grid>

        <Grid Grid.Column="1">
            <Grid.RowDefinitions>
                <RowDefinition Height="*"/>
                <RowDefinition Height="*"/>
                <RowDefinition Height="*"/>
            </Grid.RowDefinitions>

            <Button Grid.Row="0" Click="Button_Click">
                <Image Name ="btn0" Source="Images\ひまわり.png" Stretch="UniformToFill"/>
            </Button>

            <Button Grid.Row="1" Click="Button_Click_1">
                <Image Name ="btn1" Source="Images\カモミール.png" Stretch="UniformToFill"/>
            </Button>

            <Button Grid.Row="2" Click="Button_Click_2">
                <Image Name ="btn2" Source="Images\ダリア.png" Stretch="UniformToFill"/>
            </Button>
        </Grid>

    </Grid>
</Window>
MainWindow.xaml.csに以下のコードを入力します。
using System.Windows;

namespace SwitchImage
{
    /// <summary>
    /// MainWindow.xaml の相互作用ロジック
    /// </summary>
    public partial class MainWindow : Window
    {
        public MainWindow()
        {
            InitializeComponent();
        }

        private void Button_Click(object sender, RoutedEventArgs e)
        {
            image.Source = btn0.Source;
        }

        private void Button_Click_1(object sender, RoutedEventArgs e)
        {
            image.Source = btn1.Source;
        }

        private void Button_Click_2(object sender, RoutedEventArgs e)
        {
            image.Source = btn2.Source;
        }
    }
}
部分コード(MainWindow.xaml.cs)で、Sourceプロパティに、画像リーソース・ファイルを指定する
上記のコードでは、部分コードでは、Sourceプロパティは、xamlコードで使用したImage要素のSource属性を指定しました。
部分コードで、Sourceプロパティに、画像リソースを指定したい場合はどのようにすればよいのでしょうか?
C#コードでは、以下の指定の方法では、イメージソースは指定できません。
private void Button_Click(object sender, RoutedEventArgs e)
        {
            image.Source = "Images\ひまわり.png";
        }
Image要素のSourceプロパティは、ImageSouce型です。ImageSouce型に変換するためには、BitmapImageクラスを使用します。
結果、以下のコード(抜粋)になります
using System;
using System.Windows;
using System.Windows.Media.Imaging;

        private void Button_Click(object sender, RoutedEventArgs e)
        {
            // image.Source = btn0.Source;

            image.Source = new BitmapImage( new Uri("pack://application:,,,/Images/ひまわり.png"));

        }
リソースファイルの「pack://application:,,,/Images/ひまわり.png」の「pack://application:,,,/」部分は、WPFのURIスキームです。
ちなみに、UWPでは、「ms-appx:///Images/ひまわり.png」になるようです。(動作確認はしていません。動かない場合は、調べてみてください。)
修正したMainWindow.xaml.cs全体は、以下に示します。
using System;
using System.Windows;
using System.Windows.Media.Imaging;

namespace SwitchImage
{
    /// <summary>
    /// MainWindow.xaml の相互作用ロジック
    /// </summary>
    public partial class MainWindow : Window
    {
        public MainWindow()
        {
            InitializeComponent();
        }

        private void Button_Click(object sender, RoutedEventArgs e)
        {
            // image.Source = btn0.Source;

            image.Source = new BitmapImage( new Uri("pack://application:,,,/Images/ひまわり.png"));

        }

        private void Button_Click_1(object sender, RoutedEventArgs e)
        {
            image.Source = btn1.Source;
        }

        private void Button_Click_2(object sender, RoutedEventArgs e)
        {
            image.Source = btn2.Source;
        }
    }
}