メインメニューのツールに、ダイアログボックスを表示するメニュー項目を追加します。
Visual C# を使用して、"Say Hello World!" という 次のようなカスタム メニュー ボタンを追加します。
![新しいプロジェクトの作成で、[VSIX Project]を作成します。](../VS_SDK_Install/Images/VSIX_Project.png)
新しいプロジェクトの作成で、[VSIX Project]を作成します。
ここでは、開発言語にC#を選択していますが、C#の他に、Visual BasicやC++でも開発できます。
![[プロジェクト名] に「HelloWorld」と入力し、 [作成] を選択します。](../VS_SDK_Install/Images/NewProjectHellowWorld.png)
[プロジェクト名] に「HelloWorld」と入力し、 [作成] を選択します。
カスタム コマンドを追加する
![ソリューションエクスプローラーから、[source.extension.vsixmanifest]をダブルクリックして編集します。](../VS_SDK_Install/Images/vsixmanifest.png)
ソリューションエクスプローラーから、[source.extension.vsixmanifest]をダブルクリックして編集します。
[.vsixmanifest マニフェスト ファイル]は、作成する拡張機能の説明、作成者、バージョンなど、変更可能なオプションを確認できます。
![(ソリューションではなく) プロジェクトを右クリックし、 コンテキスト メニューで、 [追加] 、 [新しい項目] の順に選択します。](Images/AddItem.png)
(ソリューションではなく) プロジェクトを右クリックし、 コンテキスト メニューで、 [追加] 、 [新しい項目] の順に選択します。
![[Extensibility]の項目を選択し、[Command]を選択します。そして、名前のフィールドを[Command.cs]に変更します。](../VS_SDK_Install/Images/AddCommand.png)
[Extensibility]の項目を選択し、[Command]を選択します。そして、名前のフィールドを[Command.cs]に変更します。
新しいコマンド ファイルが ソリューション エクスプローラー に表示されます。 [リソース] ノードの下に、コマンドに関連する他のファイルが表示されます。 たとえば、画像を変更する場合は、PNG ファイルはここに表示されます。
[Extensibility]の項目から[Command]を追加したことで、コマンドを作成するコードが自動生成されます。コマンドとボタンのテキストも、自動生成されますが、そのままでは、拡張機能の利用者が、どんなコマンドか判断することができません。コマンドの機能を表す名前に変更するべきです。 コマンドの名前を変更するためには、VSCT ファイルと cs ファイルを変更する必要があります。
- VSCT ファイルを使用すると、コマンドの名前を変更するだけでなく、Visual Studio コマンド システム内の場所を定義することもできます。 VSCT ファイルを調べると、VSCT コードの各セクションが制御する対象を説明するコメントがあります。
- CS ファイルを使用すると、クリック ハンドラーなどのアクションを定義することができます。
自動生成されたvsctファイル(コメントの和訳を追加しています)
HelloWorldPackage.vsct
<?xml version="1.0" encoding="utf-8"?>
<CommandTable xmlns="http://schemas.microsoft.com/VisualStudio/2005-10-18/CommandTable" xmlns:xs="http://www.w3.org/2001/XMLSchema">

  <!--  This is the file that defines the actual layout and type of the commands.
        It is divided in different sections (e.g. command definition, command
        placement, ...), with each defining a specific set of properties.
        See the comment before each section for more details about how to
        use it. -->
  <!-- これが、実際のレイアウトとコマンドの種類を定義するファイルです。
        これは、さまざまなセクション(コマンド定義、コマンド配置など)に分割され、
         それぞれが特定のプロパティの設定を定義します。
         使用方法の詳細については、それぞれのセクションの前にあるコメントを参照してください。 -->

  <!--  The VSCT compiler (the tool that translates this file into the binary
        format that VisualStudio will consume) has the ability to run a preprocessor
        on the vsct file; this preprocessor is (usually) the C++ preprocessor, so
        it is possible to define includes and macros with the same syntax used
        in C++ files. Using this ability of the compiler here, we include some files
        defining some of the constants that we will use inside the file. -->
  <!-- VSCTコンパイラ(このファイルをVisualStudioが使用するバイナリ形式に変換するツール)には、
        vsctファイルでプリプロセッサーを実行する機能があります。;
        このプリプロセッサは、(通常)C++プリプロセッサであるため、
        C ++ファイルで使用されているのと同じ構文で、インクルードとマクロを定義することができます。
        ここにある、コンパイラのこの機能を使用して、
        私たちが、ファイル内で使用するいくつかの定数を定義するいくつかのファイルが含まれています。 -->

  <!--This is the file that defines the IDs for all the commands exposed by VisualStudio. -->
  <!-- これは、VisualStudioによって公開されるすべてのコマンドのIDを定義するファイルです。 -->
  <Extern href="stdidcmd.h"/>

  <!--This header contains the command ids for the menus provided by the shell. -->
  <!-- このヘッダには、シェルによって提供されるメニューのコマンドIDが含まれています。 -->
  <Extern href="vsshlids.h"/>

  <!--The Commands section is where commands, menus, and menu groups are defined.
      This section uses a Guid to identify the package that provides the command defined inside it. -->
  <!-- Commandsセクションは、コマンド、メニュー、メニュー・グループが定義されるところです。
       このセクションは、その中に定義されたコマンドを提供するパッケージを識別するために、Guidを使用します。 -->
  <Commands package="guidHelloWorldPackage">
    <!-- Inside this section we have different sub-sections: one for the menus, another
    for the menu groups, one for the buttons (the actual commands), one for the combos
    and the last one for the bitmaps used. Each element is identified by a command id that
    is a unique pair of guid and numeric identifier; the guid part of the identifier is usually
    called "command set" and is used to group different command inside a logically related
    group; your package should define its own command set in order to avoid collisions
    with command ids defined by other packages. -->
    <!-- このセクション内では、私たちは、異なるサブセクションを持っています。:
        メニューのために1つ、メニュー・グループのためにもう1つ、ボタン(実際のコマンド)のために1つ、
        コンボために1つ、最後の1つは、ビットマップで使用されます。
        それぞれの要素は、GUIDと数値識別子の重複していない対のコマンドidによって識別されます。;
        識別子のGUID部分は、通常、"コマンド・セット"と呼ばれます。そして、
        異なるコマンドを、論理的に関連があるグループに分類するために使用されます。;
         あなたのパッケージは、他のパッケージで定義されたコマンドIDとの衝突を回避するために、
         独自のコマンド・セットを定義する必要があります。 -->

    <!-- In this section you can define new menu groups. A menu group is a container for
         other menus or buttons (commands); from a visual point of view you can see the
         group as the part of a menu contained between two lines. The parent of a group
         must be a menu. -->
    <!-- このセクションでは、あなたは、新しいメニュー・グループを定義できます。
          メニュー・グループは、他のメニューやボタン(コマンド)のためのコンテナです。;
          ビューの視点から、
          あなたは、グループを2つの行の間に含まれるメニューの一部とみなすことができます。
          グループの親は、メニューである必要があります。 -->
    <Groups>
      <Group guid="guidHelloWorldPackageCmdSet" id="MyMenuGroup" priority="0x0600">
        <Parent guid="guidSHLMainMenu" id="IDM_VS_MENU_TOOLS"/>
      </Group>
    </Groups>

    <!--Buttons section. -->
    <!-- Buttonsセクション。 -->
    <!--This section defines the elements the user can interact with, like a menu command or a button
        or combo box in a toolbar. -->
    <!-- このセクションは、ツールバー内のメニュー・コマンドやボタンやコンボ・ボックスのような、
    ユーザーが対話できる要素を定義します。 -->
    <Buttons>
      <!--To define a menu group you have to specify its ID, the parent menu and its display priority.
          The command is visible and enabled by default. If you need to change the visibility, status, etc, you can use
          the CommandFlag node.
          You can add more than one CommandFlag node e.g.:
              <CommandFlag>DefaultInvisible</CommandFlag>
              <CommandFlag>DynamicVisibility</CommandFlag>
          If you do not want an image next to your command, remove the Icon node /> -->
      <!-- あなたが、メニューグループを定義するには、そのID、親メニュー、その表示優先度を指定する必要があります。
            コマンドは、デフォルトでは、visibleで、使用可能です。
            あなたが、visibility、statusなどを変更する必要がある場合、
            あなたは、CommandFlagノードを使用することができます。
            あなたは、複数のCommandFlagノードを追加できます。例:
              <CommandFlag>DefaultInvisible</CommandFlag>
              <CommandFlag>DynamicVisibility</CommandFlag>
            あなたが、コマンドの横に画像が必要ない場合、Iconノードを削除します。 -->
      <Button guid="guidHelloWorldPackageCmdSet" id="CommandId" priority="0x0100" type="Button">
        <Parent guid="guidHelloWorldPackageCmdSet" id="MyMenuGroup" />
        <Icon guid="guidImages" id="bmpPic1" />
        <Strings>
          <ButtonText>Say Hello World!</ButtonText>
        </Strings>
      </Button>
    </Buttons>

    <!--The bitmaps section is used to define the bitmaps that are used for the commands.-->
    <!-- ビットマップ・セクションは、コマンドのために使用されるビットマップを定義するために使用されます。 -->
    <Bitmaps>
      <!--  The bitmap id is defined in a way that is a little bit different from the others:
            the declaration starts with a guid for the bitmap strip, then there is the resource id of the
            bitmap strip containing the bitmaps and then there are the numeric ids of the elements used
            inside a button definition. An important aspect of this declaration is that the element id
            must be the actual index (1-based) of the bitmap inside the bitmap strip. -->
      <!-- ビットマップIDは、他のIDとは少し異なる方法で定義されています。:
            宣言は、ビットマップの小片のためのGUIDから始めます。
            続いて、ビットマップが含まれているビットマップの小片のリソースIDが、あります。
            続いて、ボタン定義内で使用される要素の数値IDがあります。
            この宣言の重要な側面は、要素IDが、ビットマップの小片の内側のビットマップの
            実際の(1から始まる)インデックスである必要があるということです。 -->
      <Bitmap guid="guidImages" href="Resources\Command.png" usedList="bmpPic1, bmpPic2, bmpPicSearch, bmpPicX, bmpPicArrows, bmpPicStrikethrough"/>
    </Bitmaps>
  </Commands>

  <Symbols>
    <!-- This is the package guid. -->
    <!-- これは、パッケージGUIDです。 -->
    <GuidSymbol name="guidHelloWorldPackage" value="{33f26680-f4bc-4410-90f6-131daf650a91}" />

    <!-- This is the guid used to group the menu commands together -->
    <!-- これは、メニュー・コマンドをグループ化するために使用されるGUIDです。 -->
    <GuidSymbol name="guidHelloWorldPackageCmdSet" value="{25f17fe9-6836-4f0c-b0e1-d397ea976484}">
      <IDSymbol name="MyMenuGroup" value="0x1020" />
      <IDSymbol name="CommandId" value="0x0100" />
    </GuidSymbol>

    <GuidSymbol name="guidImages" value="{18bea2c1-66f3-41bd-9f2f-83c1584c3a9a}" >
      <IDSymbol name="bmpPic1" value="1" />
      <IDSymbol name="bmpPic2" value="2" />
      <IDSymbol name="bmpPicSearch" value="3" />
      <IDSymbol name="bmpPicX" value="4" />
      <IDSymbol name="bmpPicArrows" value="5" />
      <IDSymbol name="bmpPicStrikethrough" value="6" />
    </GuidSymbol>
  </Symbols>
</CommandTable>
自動生成されたcsファイル(コメントの和訳を追加しています)
Command.cs
using System;
using System.ComponentModel.Design;
using System.Globalization;
using System.Threading;
using System.Threading.Tasks;
using Microsoft.VisualStudio.Shell;
using Microsoft.VisualStudio.Shell.Interop;
using Task = System.Threading.Tasks.Task;

namespace HelloWorld
{
    /// <summary>
    /// Command handler
    /// </summary>
    internal sealed class Command
    {
        /// <summary>
        /// Command ID.
        /// </summary>
        public const int CommandId = 0x0100;

        /// <summary>
        /// Command menu group (command set GUID).
        /// Commandメニュー・グループ(コマンドセットGUID)。
        /// </summary>
        public static readonly Guid CommandSet = new Guid("25f17fe9-6836-4f0c-b0e1-d397ea976484");

        /// <summary>
        /// VS Package that provides this command, not null.
        /// VSパッケージは、nullではなく、このコマンドを提供します。
        /// </summary>
        private readonly AsyncPackage package;

        /// <summary>
        /// Initializes a new instance of the <see cref="Command"/> class.
        /// <see cref="Command"/>クラスの新しいインスタンスを初期化します。
        /// Adds our command handlers for menu (commands must exist in the command table file)
        /// メニューのために、私たちのコマンド・ハンドラを追加します
        /// (コマンドは、コマンド・テーブル・ファイルに存在する必要があります)。
        /// </summary>
        /// <param name="package">Owner package, not null.</param>
        /// nullではないOwnerパッケージ。
        /// <param name="commandService">Command service to add command to, not null.</param>
        /// nullではなく、コマンドを追加するためのCommandサービス。
        private Command(AsyncPackage package, OleMenuCommandService commandService)
        {
            this.package = package ?? throw new ArgumentNullException(nameof(package));
            commandService = commandService ?? throw new ArgumentNullException(nameof(commandService));

            var menuCommandID = new CommandID(CommandSet, CommandId);
            var menuItem = new MenuCommand(this.Execute, menuCommandID);
            commandService.AddCommand(menuItem);
        }

        /// <summary>
        /// Gets the instance of the command.
        /// コマンドのインスタンスを取得します。
        /// </summary>
        public static Command Instance
        {
            get;
            private set;
        }

        /// <summary>
        /// Gets the service provider from the owner package.
        /// 所有者パッケージからサービス・プロバイダを取得します。
        /// </summary>
        private Microsoft.VisualStudio.Shell.IAsyncServiceProvider ServiceProvider
        {
            get
            {
                return this.package;
            }
        }

        /// <summary>
        /// Initializes the singleton instance of the command.
        /// コマンドのシングルトン・インスタンスを初期化します。
        /// </summary>
        /// <param name="package">Owner package, not null.</param>
        public static async Task InitializeAsync(AsyncPackage package)
        {
            // Switch to the main thread - the call to AddCommand in Command's constructor requires
            // the UI thread.
            // メイン・スレッドに切り替える-CommandのコンストラクターでAddCommandを呼び出すには、UIスレッドが必要です。
            await ThreadHelper.JoinableTaskFactory.SwitchToMainThreadAsync(package.DisposalToken);

            OleMenuCommandService commandService = await package.GetServiceAsync(typeof(IMenuCommandService)) as OleMenuCommandService;
            Instance = new Command(package, commandService);
        }

        /// <summary>
        /// This function is the callback used to execute the command when the menu item is clicked.
        /// メニュー項目が、クリックされたとき、この関数は、コマンドを実行するために使用されるコールバックです。
        /// See the constructor to see how the menu item is associated with this function using
        /// OleMenuCommandService service and MenuCommand class.
        /// OleMenuCommandServiceサービスとMenuCommandクラスを使用して、メニュー項目が、
        /// この関数にどのように関連付けられているかを確認するには、コンストラクターを参照してください。
        /// </summary>
        /// <param name="sender">Event sender.</param>
        /// <param name="e">Event args.</param>
        private void Execute(object sender, EventArgs e)
        {
            ThreadHelper.ThrowIfNotOnUIThread();
            string message = "Hello World!";
            string title = "Command";

            // Show a message box to prove we were here
            // 私たちが、ここにいたということを証明するために、メッセージ・ボックスを表示します。
            VsShellUtilities.ShowMessageBox(
                this.package,
                message,
                title,
                OLEMSGICON.OLEMSGICON_INFO,
                OLEMSGBUTTON.OLEMSGBUTTON_OK,
                OLEMSGDEFBUTTON.OLEMSGDEFBUTTON_FIRST);
        }
    }
}
コマンドの名前を変更する
ソリューション エクスプローラー で、拡張機能 VS パッケージの VSCT ファイルを見つけます。 この例では、HelloWorldPackage.vsct という名前です。
自動生成されたvsctファイルを変更することで、コマンドファイルの名前を変更します。 Buttonsセクションで、ButtonText パラメーターを Say Hello World! に変更します。
  ...
  <Button guid="guidCommandPackageCmdSet" id="CommandId" priority="0x0100" type="Button">
     <Parent guid="guidCommandPackageCmdSet" id="MyMenuGroup" />
     <Icon guid="guidImages" id="bmpPic1" />
     <Strings>
        <ButtonText>Say Hello World!</ButtonText>
     </Strings>
  </Button>
  …
ソリューション エクスプローラー に戻り、Command.cs ファイルを見つけます。 Execute メソッドで、文字列 message を string.Format(..) から Hello World! に変更します。
  ...
  private void Execute(object sender, EventArgs e)
  {
    ThreadHelper.ThrowIfNotOnUIThread();
    string message = "Hello World!";
    string title = "Command";

    // Show a message box to prove we were here
    VsShellUtilities.ShowMessageBox(
        this.ServiceProvider,
        message,
        title,
        OLEMSGICON.OLEMSGICON_INFO,
        OLEMSGBUTTON.OLEMSGBUTTON_OK,
        OLEMSGDEFBUTTON.OLEMSGDEFBUTTON_FIRST);
  }
  ...
実行する
F5 キーを押して、 [デバッグの開始] コマンドを実行します。
新たに、Visual Studioが起動します。
コード無しで実行をクリックします。
![ツールメニューに、[Say Hello World!] が存在することを確認し選択します。](Images/SayHelloWorldTool.png)
ツールメニューに、[Say Hello World!] が存在することを確認し選択します。
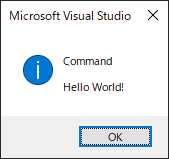
「Command Hello World!」と表示されたダイアログが表示されます。